La Vie de Miccah Marie
my thoughts on life, love, faith, and motherhood
Mom Connections

It was my second time back to my twice-a-month moms group after giving birth to my second baby girl. Several moms there asked me how I was doing. At that time, my baby girl was six weeks old. I was able to tell them all, without the tiniest inkling of feeling like I’d cry, how things were a million times better than they were even two weeks prior. “You were having a hard time two weeks ago?” I was asked with shocked expressions. I must have been putting up quite a brave front. Maybe I was wearing makeup? I had been on the verge of tears for four weeks straight two weeks before. I’d felt like I had pulled an all-nighter since my baby had been born. My 2-year-old would question me in my apparently surprising bursts of laughter, “Mommy crying?” because for most of the day, I had been streaming tears. While seeming to be perceptive on one hand, she would also lunge for her baby sister’s head with her fingernails at every opportunity. She would angrily bark, “No!” every time her baby sister cried, which ripped my heart out. As I drove home from that moms meeting, I was heavy-hearted. Had I not shared the truth about how I felt because I didn’t feel like the opportunity was there? How many people do we encounter that are struggling but we never ask, because they seem to have it all together? Or worse, maybe we don’t ask because we don’t want to go that deep with people.
Motherhood is incredibly isolating and lonely, particularly as a mother of babies. Prior to moving to Charlotte last July, we lived in Connecticut and I had just two close mom friends. It wasn’t a lot, but those two moms were exactly what God knew I needed to get through the first year of my first-born daughter’s life. Those women were my lifelines. I met my first friend while working at Yale New Haven Hospital. She was a PA and I was a research coordinator. She had three boys ages 1, 3, and 6, and invited me over at least once a week. I was terrified to drive anywhere with my tiny new baby in that huge car seat, but I drove to her house every time, which made me braver at each visit. Initially, we would just have coffee in the morning, but then our visits turned into all day events. We’d have coffee, lay our babies down for naps, we’d do an exercise video, and then sit on the couch or work in her garden and talk about life. I met my second mom friend in our church’s community group. She had her baby boy a few months after I had my daughter, and it was such a sweet time of life for us to figure out together breastfeeding, sleep schedules, introducing first foods, and how to maintain a relationship with God and with our husbands when our babies were getting the first and best of us.
Sharing life and being completely transparent with those two women did not happen overnight. It was a little awkward at first, but as we continued to see each other each week, we felt more comfortable and could share more intimately. Along with prayer, they truly brought me through the first year of motherhood. I don’t think I would have held on to my sanity or my joy without them. Intentionality is the key to any relationship that is worth maintaining. We must be intentional about getting together and/or having conversations, and we have to be brave and be willing to be real. Facebook posts and texting just doesn’t cut it. We were created for community. Especially as moms, we need each other. It seems the harder life is with small children, the harder it is to get out and be social. I find myself not leaving my house for millions of reasons, like my baby is fussy, or because my two-year-old has a runny nose, or it’s a hundred degrees outside, or because I’m exhausted. But I can feel the lack of kindred adult interaction drain me. When life is hardest and least convenient, that’s when we need encouragement and community the most. Motherhood, and life in general, is messy, frustrating, gut-wrenching, emotionally and physically exhausting, but it is also beautiful, rewarding, and challenges us to become better.
We can only realize the full beauty and joy of raising children when we ourselves are filled. We cannot expect our children to fulfill our souls’ need for friendship and community. Firstly, God alone fills that hole. He is our creator and only when we have a relationship with him is our identity found. Secondly, we need other moms around us. And not just any mom will do. We need moms who are real, not afraid to bare their tears or scars through smiles and laughter. We need moms who will not flinch when the truth is ugly. We need moms who love their children for the God-given gifts they are, and who want to raise (or have raised) their kids to be bright lights and world-changers. We need moms whose lives are also messy and inconvenient, but still choose to make the time to go deep. This year, I’m jumping in. I will be the first to be that mom.
Buttermilk biscuit muffins

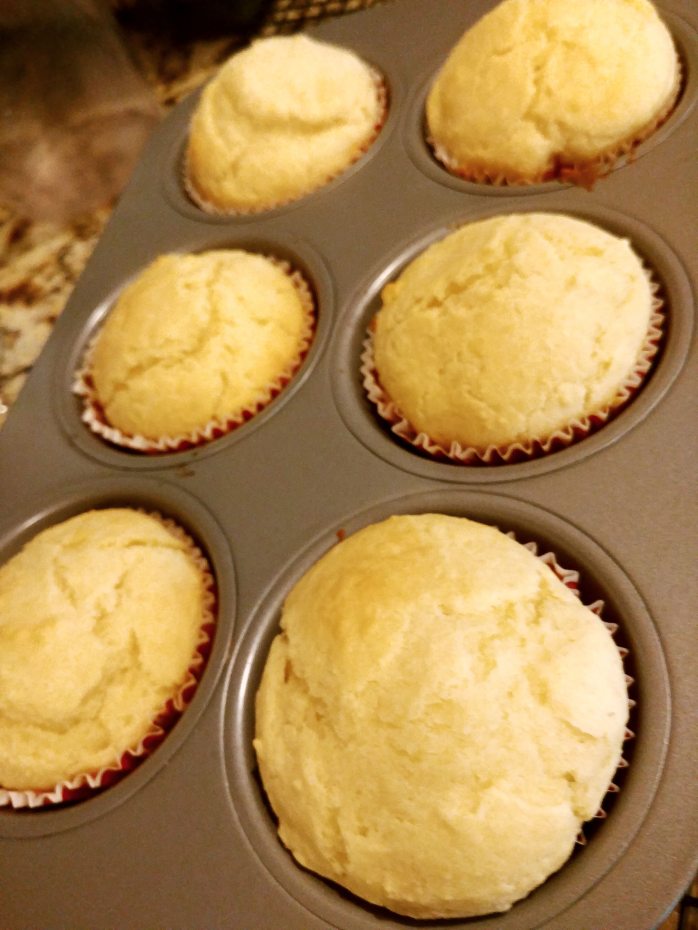
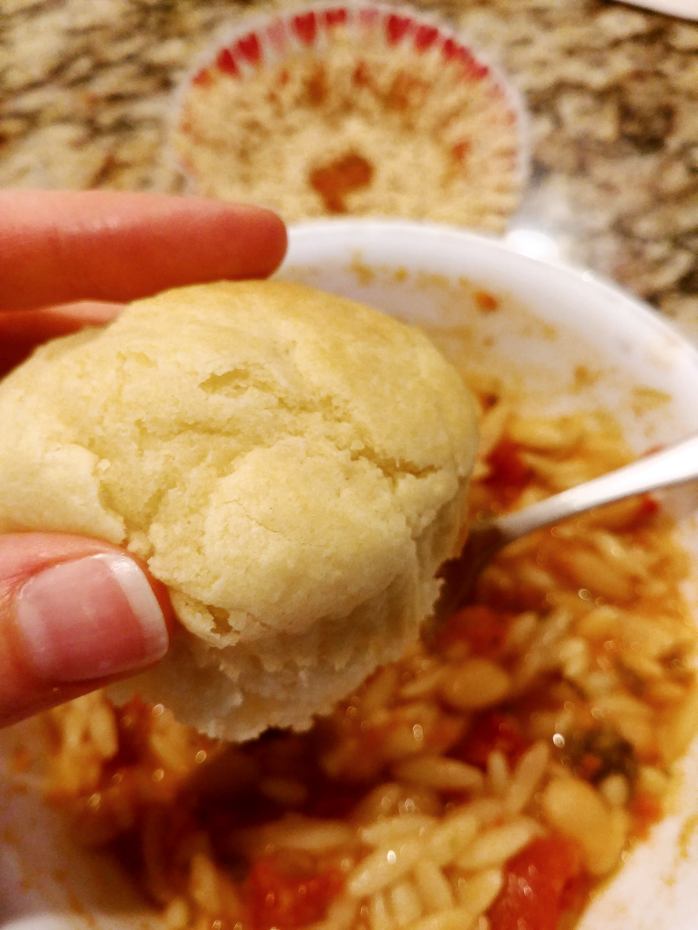
I’m going to be up front and tell you that I did not grow up in a Southern family. While I did grow up in Virginia, my mom grew up in the midwest and her parents were from California, and my dad was born in France and was raised by a French mother. Nobody in my family will lynch me for making “non-traditional” biscuits. However, if you and your family have your religion based on southern buttermilk biscuits, you may choose to stop here. However, I guarantee if you taste these babies, you will convert. I actually was planning to make traditional buttermilk biscuits, but I didn’t want to make a dozen of them. Biscuits always taste the best right out of the oven, and just don’t taste the same as leftovers. So, I followed my recipe, cutting in half every ingredient. That is, every ingredient except for the buttermilk. I realized it only after pouring my whole amount of milk into my food processor, and watched it get completely absorbed by the flour. There was no way to pour it out, so I decided to keep going with the recipe. The dough was too wet to actually form into a ball, so I scooped it out into muffin cups and baked them for the same amount of time prescribed. I was beyond excited that they came out into perfectly tender, flakey, buttery biscuit muffins. They’re delicious with jam or honey and butter, or plain and serve them with gravy or with soups. The only thing you may not be able to do with them as you would a traditional biscuit is make them into a sandwich because they’re so delicate. As an added bonus, these are quick to prepare as long as you have a food processor.
This recipe makes enough dough for 6 muffins.
Ingredients:
- 1/2 c unbleached all-purpose flour
- 1/2 c plain cake flour (if you don’t have cake flour, substitute with all-purpose flour and use 1 Tbs more buttermilk)
- 1 tsp baking powder
- 1/4 tsp baking soda
- 1/2 tsp sugar
- 1/4 tsp salt
- 4 Tbs (half a stick) cold, unsalted butter, cut into 1/4″ cubes
- 3/4 c cold buttermilk OR
- Pour 1 Tbs lemon juice or white vinegar into a measuring cup. Then, pour enough milk (nothing less than 2%- whole or even half & half is best) to fill to just above the 3/4 cup line. Stir with a fork and allow to sit in fridge until ready to use.
Directions:
- Adjust oven rack to the middle position and heat to 450 degrees.
- Place all the dry ingredients into the food processor fitted with the metal blade. Process with six 1-second pulses. Or use a whisk and combine.
- Remove the cover of the food processor and distribute the butter pieces evenly over the dry ingredients. Cover and process with twelve 1-second pulses. If making by hand, use two knives, a pastry blender, or your fingers to quickly cut in the butter until the mixture resembles coarse meal.


- If using the processor, remove the cover and pour the buttermilk evenly over the dough. Process until the dough is completely combined, and there are no more flour pockets. If making by hand, stir in the buttermilk with a rubber spatula or fork until completely combined. The dough will be fluffy with lots of air bubbles.


5. Scoop out with a rubber spatula into a greased muffin tin, or the silver muffin cup liners. I used paper ones because that’s all I had, and they work, but when you want to eat them warm, some of the muffin sticks to the paper.
6. Bake until the tops are light brown, 10-12 minutes. Serve immediately.
Fruit and Spinach Smoothie

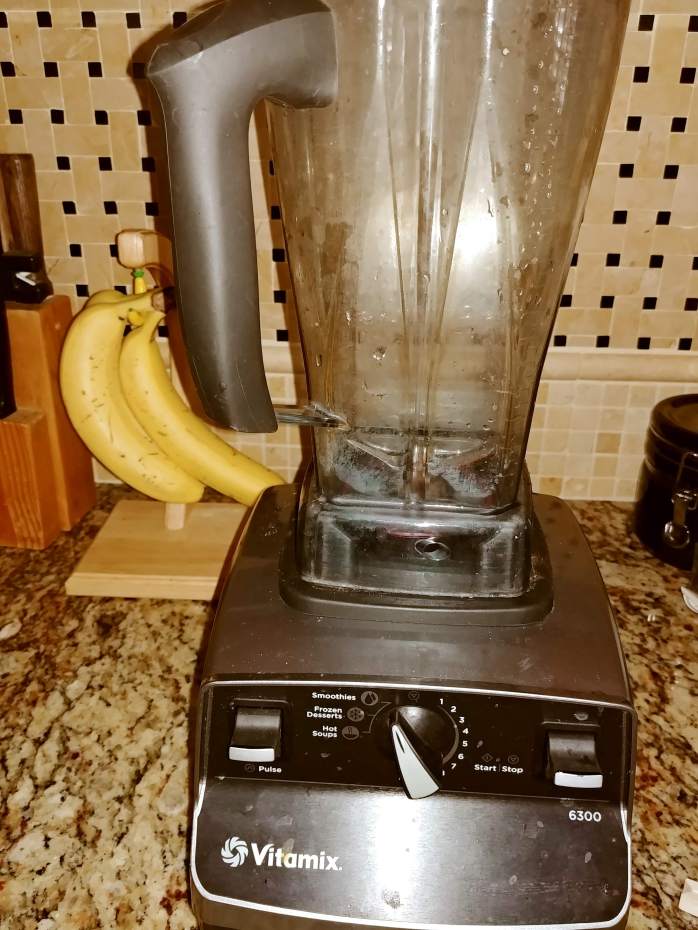
A few years ago, one of my dear friends told me about a documentary entitled, “Fat, Sick, and Nearly Dead.” While it sounds horribly depressing, it was actually a very uplifting and encouraging documentary about an Australian businessman who decided he was tired of being overweight and tired of popping steroids every day for an autoimmune disorder. It was his quest to try a juice fast for 60 days while road-tripping around the US. Throughout the film, he loses weight, his autoimmune disorder disappears, he comes completely off steroids (all monitored by his physician), and he helps other people along the way. I was intrigued. While I didn’t have weight to lose or an autoimmune disorder, I definitely didn’t feel like I was eating enough fruits or vegetables every day. I didn’t have a Breville juicer, but I did have a Vitamix (a very cool and admittedly pricey, blender), and so I decided to start making a smoothie every day. Starting from just before I got pregnant with my now two-year-old, I have been pretty consistent having one a day as long as I’m home and have access to my Vitamix. If I skip a day, I actually crave one. It’s a perfect way to get a bunch of fruits and veggies knocked out in one glass, and it’s darn delicious.
This is a general recipe, but definitely feel free to add your own fruit mix to it. This will make one HUGE smoothie, or enough for two medium sized glasses.
- 1 ripe banana (you don’t want a totally green one or it will taste starchy, nor do you want a super spotty one that should be used for banana bread)
- 1 good sized juicy fruit, seeded and cut into chunks (a peeled orange, a ripe peach, a ripe pear, or about 3/4 c of grapes all work great)
- about 3/4 cups of plain cashew, almond, or coconut-milk yogurt *stay away from dairy, and use this amazing Cashewgurt made by Forager Project*
- 2 handfuls of organic baby spinach (about 2 cups)
- 1/2 c frozen mixed berries or other frozen fruit (I love the frozen blueberry, blackberry, strawberry mix- do NOT get the kind that has the kale in it. Yuck.)
- 1 c water
other optional add-ins/replacements:
- 2 Tbs flax seeds
- 1-2 Tbs Elderberry syrup
- replace the yogurt with a ripe avocado
- 1 raw carrot or one cooled, peeled, roasted beet
Today’s smoothie consisted of a banana, a navel orange, cashewgurt, spinach, a carrot, Elderberry syrup, frozen mixed berries, and water. Absolutely delicious. And my two-year-old sucked it down too!


An unexpected memory

I just found out last night that a man I used to work with nearly 18 years ago passed away last year. John was a big, loud, boisterous guy whose daily uniform consisted of a short sleeve button down shirt and some Loony Toons tie. He always had a story to tell, even if you didn’t have the time to hear it, nor the desire, since he never recollected which stories he’d already shared or with whom. He had two little girls and was always proud to show off their pictures. I remember he wanted to meet my dad and shake his hand when I told him that my dad had me watch Monty Python and the Holy Grail before letting me go off to college.
It was my first “real” job after college and I had eagerly accepted the opportunity to live in Baltimore, not far from where I had spent the first 16 years of my life. Hearing the news about his passing brought a rush of memories to my mind from those nearly four years of my life. During that time, the attacks on 9/11 occurred during the day we were all supposed to move our cubicles into the newly renovated part of our building. All of us dragged out the move, one box at a time, as we each snuck out to the greasy restaurant next door to watch the only television in the building. Our managers kept telling us to get back to work and be “billable,” since we were contracted for a specific project. Of course, their warnings fell on deaf, distracted ears. But, none of us had any idea how or how much the world would be forever changed that day. Just over a year later, another crazy, scary event occurred. In October 2002, there was a sniper going around the DC/Maryland area shooting people at random in parking lots and gas stations. I can remember pumping gas with my heart thumping with fear in my chest. As I squeezed the handle, I was purposely dancing around so I would be a harder-to-hit moving target, and laughed nervously as I met eyes with everyone else at the gas station thinking and doing the same thing.
Those three and a half years were formative ones, almost like an extension of college. Most of my coworkers had also just graduated from college, and this was their first job away from home. The few, older coworkers we had ended up being reluctant parents to us all, no doubt shaking their heads and thanking their stars they were past this stage of life. We all grew up while making a ton of dumb, embarrassing decisions in the process. Well, I sure made a ton of them anyways. I don’t often get to see those Baltimore peeps, nor do I keep in touch with many of them, but that season in our lives links us. No explanation is needed. While I haven’t thought about John in several years, I mourn his loss. While I wouldn’t go back and relive those years, those people and that time hold a special place in my heart. A great quote from Steve Martin’s character in Father of the Bride said this, “Well, that’s the thing about life, is the surprises, the little things that sneak up on you and grab hold of you.”
Chewy Granola Bars

When I’m in the mood for a snack, I crave nutty, salty, and a little sweet. These chewy granola bars totally hit the spot. They take a little time to make, maybe an hour of actual labor, but this makes a whole pan, and they can keep for up to three weeks (if they manage to last that long in your house). In our house between my two year old and me, they’re gone in a week!
Ingredients
- 3/4 c walnuts
- 3/4 c cashews (you could omit these and use 1 1/2 c walnuts)
- 2 1/2 c old-fashioned rolled oats (do NOT use quick oats)
- 1/2 c raw sunflower seeds
- 1/2 c raw pumpkin seeds (you could omit these and use 1 c sunflower seeds)
- 1 c dried Turkish or Mediterranean apricots
- 1 c packed brown sugar
- 3/4 tsp salt
- 1/2 c coconut oil
- 3 Tbs water
- 1 1/2 c Rice Krispies cereal
- 1 c dried cranberries (or dried blueberries, or both!)
Directions
- Heat oven to 350 degrees and make sure oven rack is in the middle. Make a foil sling for a 13×9″ baking pan by folding 2 long sheets of foil; first sheet is 13″ wide and second sheet 9″ wide. Lay sheets of foil in pan perpendicular to each other, with extra foil hanging over the edges. Push the foil into the corners and smooth it all out. Lightly spray the foil with vegetable oil or smear coconut oil all over the bottom and sides.
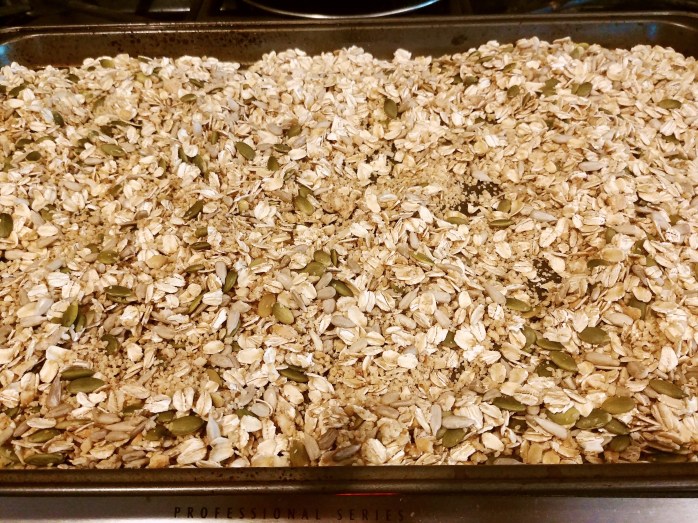
- Pulse the nuts in a food processor until finely chopped, 8-10 pulses. Spread nuts, oats, and seeds on a separate, large, rimmed baking sheet and toast until lightly browned and fragrant, 12-15 minutes, stirring halfway through toasting.
- While the oat mixture toasts, process the apricots, sugar, and salt in the food processor until apricots are very finely ground, about 15 seconds. Add in the water and coconut oil, continuing to process until a homogenous paste forms, about 1 minute longer. Dump the paste into a large, wide bowl.
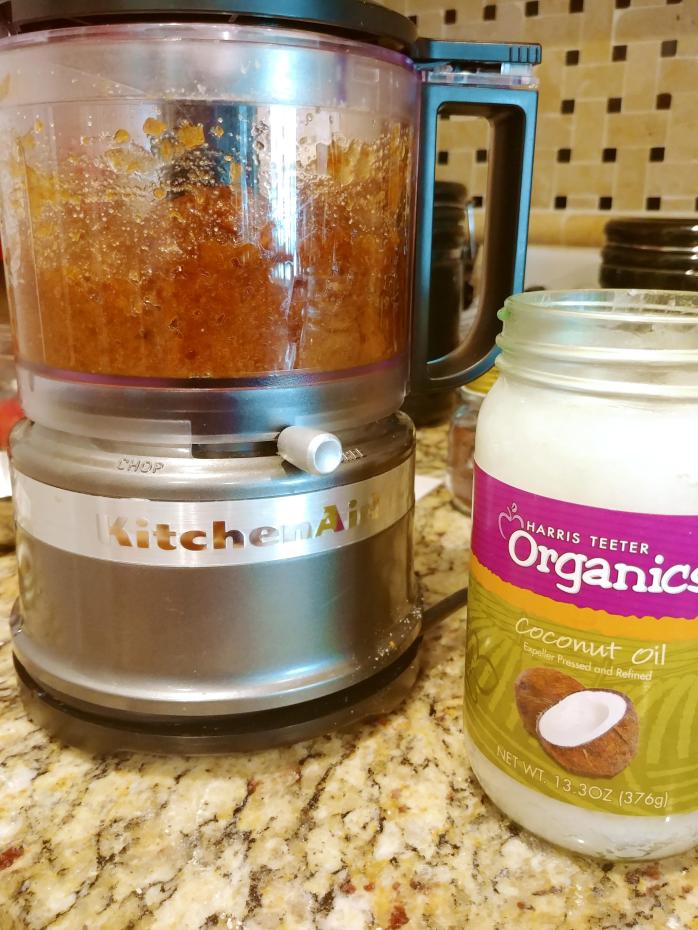
Make sure you use refined coconut oil since it has no coconut smell or taste - When the oats are done toasting, pour them into the bowl containing the apricot mixture and stir with a rubber spatula until well coated. Add cereal and cranberries and stir gently until everything is evenly mixed. Transfer mixture to prepared 9×13 baking pan and spread into an even layer. Place a sheet of parchment or waxed paper on top of the granola and press and smooth very firmly with your hands, especially at the edges and corners, until granola is level and compact.

She’s enjoying watching Mama make these! - Remove the parchment and bake the granola until fragrant and just beginning to brown around the edges, about 25 minutes. Transfer the pan to a wire rack and let cool for 1 hour. Using the foil overhang, lift granola out of pan. Return to the wire rack and let cool completely for another hour.
- Peel off and discard foil, transferring granola to a cutting board. Using a sharp chef’s knife, cut the granola in half crosswise to create two 6 1/2 by 9″ rectangles. Cut each rectangle in half to make four 3 1/4 by 9″ strips. Cut each strip crosswise into 6 equal pieces.

- Store granola bars in an airtight container between sheets of parchment or waxed paper. As they disappear, transfer the bars to a smaller container to prevent them from drying out. Stored like this, they could theoretically keep for three weeks!

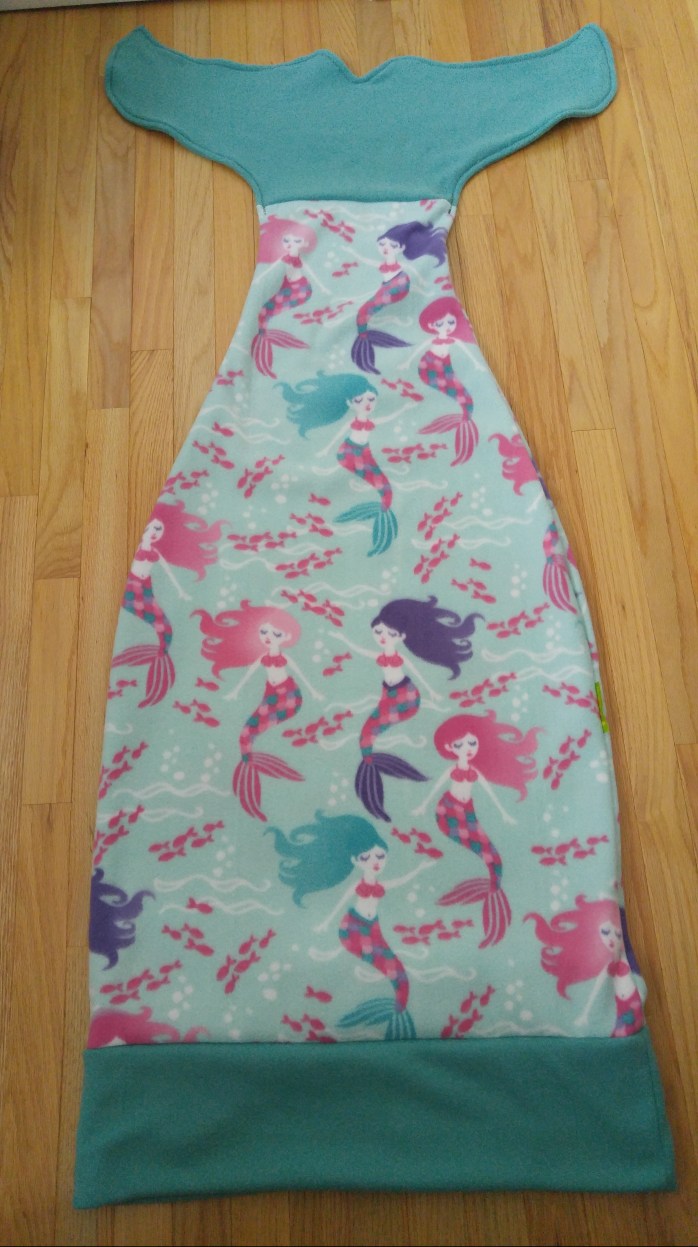
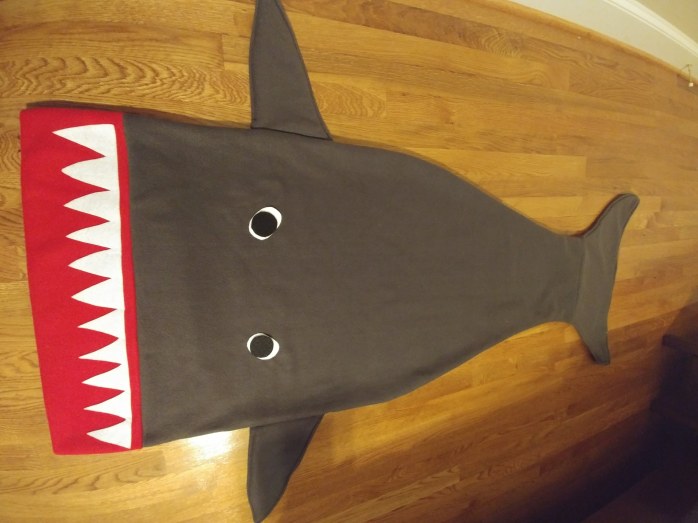
Shark/Mermaid tail blanket

Mermaid tail blankets have been all the rage. But they’re stinking expensive if you try to buy one already made! I not only have three nieces, I also have two nephews. I’m pretty sure neither of those boys would be thrilled with a mermaid blanket. But a shark blanket? YES. Honestly, these blankets are super easy to sew together. You’ll need to first draw your pattern on some wrapping paper. In this blanket’s simplest pattern, you’ll have three pattern pieces to cut out. You’ll have the body, the tail fin (in which your kid’s feet will fit), and the top, or mouth. Depending on how big you want your blanket will determine how much material to get. I like the warmth and feel of anti-pill fleece fabric. If you’re making a shark or other animal like this example, I bought some starchy felt that had a sticky peel-off backing for the eyes and teeth.

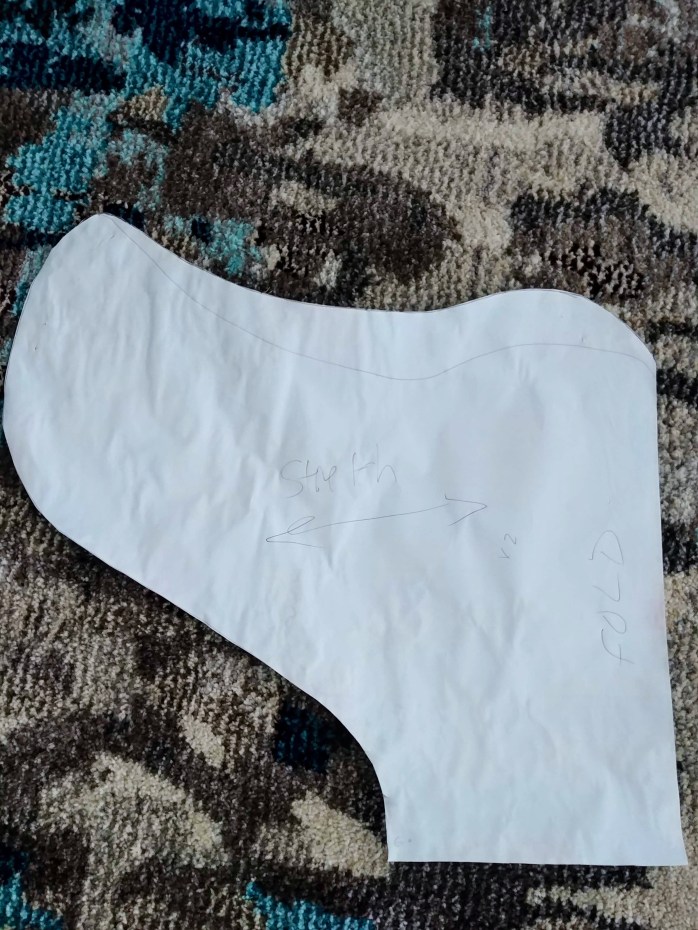
To make the body pattern, either have your kid lay down on the paper to measure how long the blanket needs to be, from armpit to ankles, or use your own legs. Since this is a blanket, you want to make it roomy. Draw just one side of the body so that when you fold it over, the sides match and look the same. I made my body pattern 45″ long and 13″ wide. The skinny end is 7″ wide, but you’ll want to make sure that will accommodate your kiddo’s ankles. To help you cut out the material correctly, write on the pattern. Your material should stretch widthwise, and you will want the fold of your material on the straight long edge. You will cut 2 on the fold, so that when you finish cutting, you will have a front and back body of your blanket that is 26″ wide at its widest point and 14″ wide at the ankles.

For the fin, again, you will only draw one side so that when you cut on the fold, the tail fins are mirror images. Ensure that the material stretches the width of the fin, and the fold is the length. The little skinny end at the bottom should be the same with as the skinny end of your body pattern. You will cut 2 of these fins on the fold, again so that you have a whole front and back fin. My fin is 15.25″ at it’s widest point, and 10.5″ at the straight fold. So, when I cut out my material, I would have a fin 30.5″ wide.
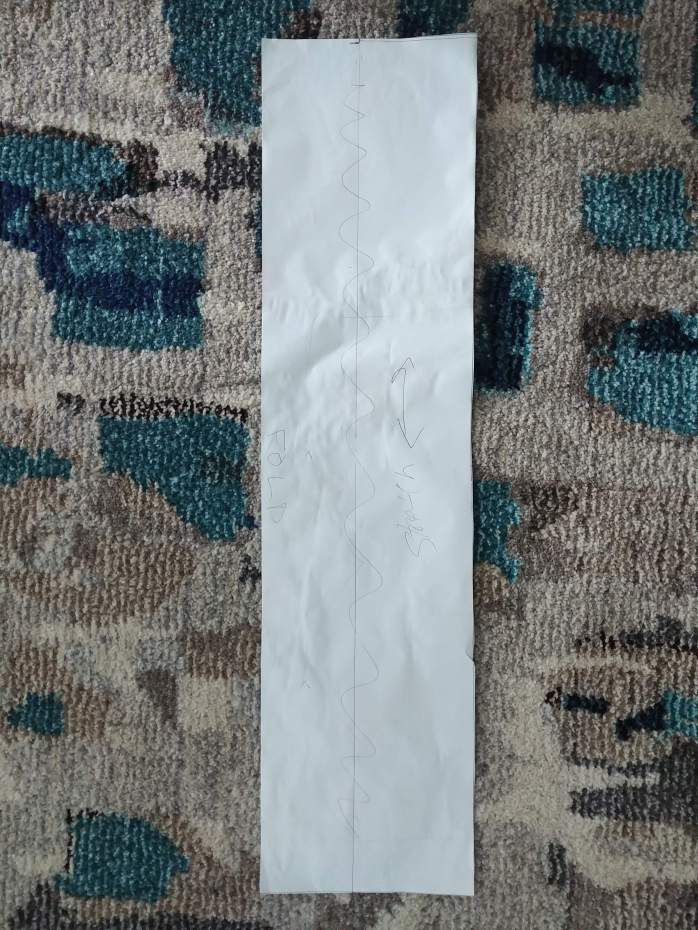
This is the mouth of the blanket. You’ll want the stretch to run the length of the material, and the fold on one of the long sides. Mine is 6″ wide and 26″ long. The length of the mouth should be double the width of the top of your body pattern. So when I cut the material, I would have a 12″ wide, 26″ long strip.
Now that your material is cut, it’s time to piece everything together. First, determine the “right” and “wrong” sides of your pieces of material. The right side is the side that the pattern is intended to be seen. The wrong side is the side you want to be hidden. Next, it’s time to sew your mouth pieces on to the front body piece and on to the back body piece.
- Fold your mouth piece long ways so that it is the longest length (26″ and 6″ wide just like your pattern). If your material is such that you have a preference for which side is the inside of your blanket, make sure you sew the mouth on to the outside (or right side) of the body piece. For your mouth piece, if there is a wrong side, make sure the wrong side gets folded inside, and the right side is what is visible. Match the ends to the top end of the body at it’s widest point, so that the mouth and body should be the same width. The fold of the mouth should be down, and the raw edges of the mouth should be up, matching to the raw edge of the body, so you have three pieces of material to sew together. Sew together about a half inch away from the edge. I used a large zig-zag stitch since the fleece material is pretty stretchy, and make sure you backstitch on both ends. Sew one mouth piece on to each body piece.

in this example, the fishy patterned material is the mouth, and the solid blue is the body. - Next, sew each fin to each body piece. Lay the fin, wrong side up on top of the right side up body piece (the mouth is already sewn on to the body, and you should not be able to see the raw edges or stitching) so that the skinny ends of each match up. Backstitch at each end.
- If you’re making a shark or some other animal with eyes, sew the eyes on the body at this point. I did not sew on the teeth, I just used the already sticky backing to hold those on. However, if you want to sew them on, I’d recommend sewing them BEFORE you sew the mouth onto the body. This way, you’re only sewing through one layer of material instead of two.
- If you’re wanting side fins, it’s time to make these too. Draw a large triangular shape onto your wrapping paper, (10″ long on the two longer sides and 7″ on the short end.) Cut four pieces of material in that shape. Sandwich two fins together, wrong sides together and sew a zigzag stitch on the two long sides, about a quarter of an inch from the edge. Leave the short end open, and then turn the fins right side out.
 vary the tail fins if you want!
- Now it’s time to turn this thing into a whole blanket! Match up your body pieces together, with the right sides facing each other, wrong sides out. If you have fins, place your fins INSIDE so that the open edge matches up to the open edge of the two body pieces. If it helps you understand how to place the fins, imagine the shark is laying in a coffin with his fins over his chest. Pin them in place so they don’t move when you sew it all together. Using the zigzag stitch, sew a half inch all the way around, starting on one side of the mouth, being sure to backstitch. You should finish on the other side of the mouth, obviously do NOT sew the top of the mouth or you won’t be able to get inside!
- Turn your blanket right side out. To make the tail fins and side fins lay flat, you may want to stitch over them, about a quarter of an inch all the way around using a straight stitch.
- Get ready for one excited kiddo!
The MOPS blog article I wrote entitled Love Times Two

The Laughing Gateau

